FT-1000D for SSTV
Using the Yaesu FT-1000D for SSTV
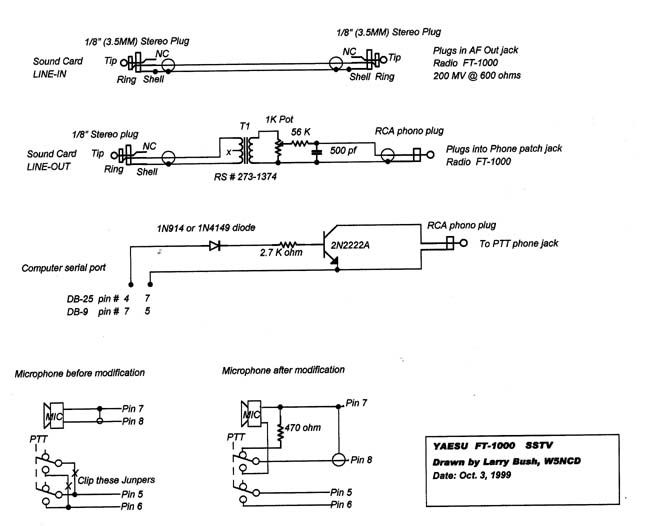
If you’re lucky enough to own a Yaesu FT-1000D it a great rig for HF SSTV. I’ve been using my FT-1000D on SSTV since 1995. You can purchase all the
parts you need to build up these interfaces from Radio Shack. To receive SSTV you want to use the audio from the AF output jack. This will give you fixed
audio level of 200 MV @ 600 ohms. This level is unaffected by the front AF volume control. Note that the audio is on the ring-side of the output jack and
not the tip. The Line-In jack on the sound card can be either tip or ring. I prefer to use the ring-side. Usually a 5-foot length of shielded cable is a
sufficient length.
Next construct the transmitter keying circuit. I always mount the diode, resistor and transistor right inside the DB-9 or DB-25 shell with about a 5-foot
cable to the PTT jack.
Connect the transceiver to a dummy load.
Turn VOX OFF. Turn speech processor OFF.
If your radio has a MONI function turn it ON.
Turn RF PWR full clockwise for 100 watts output.
Adjust MIC gain control for 100 watts peak output.
Connect the interface cables and turn the SSTV gain control full clockwise.
Next adjust the sound card audio output for 100 watts output. In this example I am using ChromaPix software. First click on Settings, then click on
preferences, then click on the SSTV TAB, Check Use PTT, then select PTT COM #1 and last select USE RTS for PTT. Now click the OK button.
You can make the following adjustment either by loading a picture and clicking transmit or you can click on tab 2, set the test tone for 5-10 seconds, click
on 1200 Hz button. In either case your transmitter should key on and you should see RF power output.
Now you want to right click on the little speaker symbol at the bottom right edge of your windows 95/98 screen, which should open up a window that
says "Open volume controls." Click on Open volume controls and you will see several gain controls. Adjust the "Volume Control" slider so that you have
100 watts RF power output. Set the Line Input control for Maximum gain.
You are now ready to transmit SSTV pictures. You want to always set the SSTV gain pot on your interface box to run 50 watts RF output. I have found
that this adjustment changes a little as you change bands. Most all HF transceivers are not rated for 100% duty cycle and SSTV is a KEY DOWN mode.
When operating SSTV on the HF bands:
Don't use the audio speech processor, turn it OFF.
Don't use the transceiver VOX circuit to key the transmitter.
Don't run full RF output power, adjust output level to 50%